


- Friday, March 25, 2016
- 0 Comments
Felt a little nostalgic this day so I went for one of my older polishes from the very little selection of OPIs in my collection.
Here is OPI's Ski Teal we drop, a dark teal blue. Anyone remember this polish? This is one of the polish more frequently used than my other OPI's because it has great formula, besides darker shades like these are always easier to add a design to in my opinion.
For this manicure I wanted to add something simple but also trying to save time for some extra sleep hence why only my ring finger nail had been the only one decorated :D

For this manicure you'll need:
- One coat of your preferred base coat (I used Essie's Protein base coat)
- Two coats of OPI's Ski Teal we drop.
- Using Barry M's Gold foil and the maple leaf design on the Bundle Monster BM04 plate, stamp the design randomly on the whole nail.
- With a dotting tool and the gold foil polish gently dot the empty spaces.
- Seal the nail with one coat of your preferred top coat. (I use INM's Out the door.)
Well, thanks for reading! Hope everyone's having a good time with Christmas around the corner. 7 days! Where did time even go?!
- Friday, December 18, 2015
- 0 Comments
I love purple! It's still my favourite even after all the other different shades I've come across through polishing. A dark purple especially.
My base is Barry M's Plum from their Gelly Hi shine collection. This was one of those with a slightly thick consistency and only took about one coat to be opaque. It's always two for me though, just in case.
I wanted to give my base a dark edge to it so the tips were sponged with Misa's I will survive, a basic black. It didn't work out so well with the base being that dark it's hardly noticeable in person.

After trying the dark tips I wanted to give those two tone flowers a try. I don't think I did so well on that but the least the flower look is distinguishable.

For this manicure:
- Apply one coat of your preferred base coat (I used Essie's protein base coat.)
- Apply two coats of Barry M's Plum.
- With a sponge and basic black polish sponge the tips until preferred results - As I mentioned this step doesn't show up as much in person so it's really optional.
- Using a toothpick and two different shades place one dot on the nail and another in the second shade overlapping half of the first. With the pointy end of the toothpick pull the dots into the middle to give it the flower look.
Polishes used here were OPI's A grape fit and Barry M's Silver foil effect. - After you're done with the flowers, randomly dot OPI's A grape fit on the middle and ring finger nail.
- Finish off with one coat of your preferred top coat. (I used INM's Out the door top coat.)


What's your favourite dark polish?
- Monday, October 05, 2015
- 0 Comments
I'd always thought that I had posted something about this polish seeing that I don't own as many OPI's as I would've liked but it seems that it hasn't made an appearance yet. I have too many colours like it that it's hard to even recall whether I've posted anything about it.
Now that Valentines and Chinese New Year is right around the corner, this seems like a great shade suited for this time of the year.
This is OPI's Conquistadorable Color. Phew. Long name isn't it but the shade is a very lovely pinkish red. If you're wondering what's going on inside the bottle I suggest you throw away the idea of even asking me about it because I simply don't know. It might have been like that when I received it but as long as the colour comes out right, which as you can see came out great, then I'm fine with it looking like so.
I wanted to leave this manicure plain but then I didn't want to. This is the struggle that I go through almost every time I'm wearing a creme and more often it's the idea of adding an awesome design that wins. Ha! Well it isn't awesome every time but I attempt to make it be so out came the nail art pens.
The pen wasn't working with me very well with all the polish oozing out of the pen tip making it harder to get a neat thin line. Even after tugging the pen lid too tight that I pulled out the whole brush out of the tube causing a polish explosion but I got there in the end and this is how it all turned out.


What's everyone's plans for Valentines and/or Chinese New year? Have you thought of your Valentine's manicure yet? :)
- Wednesday, February 11, 2015
- 0 Comments
It's been a very long time since I've worn or added any OPI's to my collection. This would be one of the newer ones I've picked up but they're really not that new. Here's Every month is Oktoberfest.
My pictures might be a little brighter than before. I was playing around with the editing and the photos seemed to show the colour best at this level of brightness. It also makes me hands look almost flawless *cheeky face*. Without the edit the shade looked a little dark to actually figure out it was a shimmery purple red duo chrome. The same case in person that it appears to be quite dark unless you're looking at it under some light, that's when you see the shimmery goodness.
The first coat was sheer so I'd say it needs at least 2 coats. Smooth application and overall it held up good for 2-3 days with some minor tip wear before removing everything.


This colour really reminds me of Christmas. Ahh thinking of it, I just can't wait.
What do you think of the colour? Does it remind you of anything?
- Friday, September 19, 2014
- 0 Comments
Anyone saw that Boxing Day haul post that I published a while ago? Well there was two OPI’s that came in the order and right now I’ll be showing you one of them, OPI’s underneath the mistletoe.

OPI’s UTM is a deep red jelly filled with silver and raspberry glitter and flakies. Application was alright with the polish having normal to thick consistency and so it only took two coats to reach full opacity. Its old news about OPI and their big brushes but this one made it harder for me to cover the sides without having to specifically go over it again.

It’s a little fast drying so as I was painting it felt a little draggy but its gorgeous shimmer is worth the time and effort. Even during clean-up it didn’t leak to give the ‘sore cuticle’ look which some reds tend to do.

The colour is beautiful but it washes out my skin tone, my hand’s actually look paler in these pictures. UTM seems too good and too much for work so I think I’d be leaving this polish for day outs or special occasions.
Did you pick up this polish when it first came out? What other OPI polishes are on your favourites list?
OPI’s UTM is a deep red jelly filled with silver and raspberry glitter and flakies. Application was alright with the polish having normal to thick consistency and so it only took two coats to reach full opacity. Its old news about OPI and their big brushes but this one made it harder for me to cover the sides without having to specifically go over it again.
It’s a little fast drying so as I was painting it felt a little draggy but its gorgeous shimmer is worth the time and effort. Even during clean-up it didn’t leak to give the ‘sore cuticle’ look which some reds tend to do.
The colour is beautiful but it washes out my skin tone, my hand’s actually look paler in these pictures. UTM seems too good and too much for work so I think I’d be leaving this polish for day outs or special occasions.
Did you pick up this polish when it first came out? What other OPI polishes are on your favourites list?
- Saturday, June 28, 2014
- 1 Comments
I’ve always been behind when it comes to getting the latest
nail stuff and let me tell you what else I’m late with, this post on a bunch of
sale goodies that was snagged back in boxing day 2013. In fact most of the
products are still sitting neatly in their packages up to this day.
Not long after the sales went live on the 26th I
happened to end up on the John Lewis website with no intention of buying
anything. Really. BUT then I saw items which had such good value that I didn’t
want to let them slip by.
There was this Nails Inc polish diary at half price of £21
and a Ciate advent calendar for sale at the same price with an original retail
value of £119. Tell me how could I let these go?!
To qualify for free shipping I also flung in two OPI
polishes worth £5.75 in my basket, those being Every month is oktoberfest and Underneath
the mistletoe. Only after they arrived did I realise that they were both part
of the red family. It would’ve been good to get two totally different ones.
Oops.
This being the first time ordering from John Lewis and
considering it was during peak season; have to say I was extremely happy with
the postage and packaging. You have to be when you order a few hours after
midnight on the 26th and receive your order around noon on the 27th.
My order was separated into two boxes with the two OPI’s in a bubble wrapped
envelope in one of them.
The nails Inc diary consists of 12 nail colours which makes
them a little less than £2 at the price I purchased these. The material feel
like good quality, at least it’s not one of those cheap glittery boxes so no glittery
residue is left behind. It also has a magnetic closure and strap, even if it
won’t be used to hold the polishes it still could be kept for something else.
The Ciate Advent calendar has 24 days for you to pop open.
When I was counting I’m pretty sure that’s how much there was. 19 mini polishes
with 4 sequin bottles and a free funnel but 24 days? What about Christmas?
Nothing there? Regardless, it’s still a good value so I’ll forget that.


Sorry about the quality of the photos. The pieces were too big to fit in my light box that I had to look for alternative ways to photograph them at night but thanks for reading ;)
- Saturday, April 12, 2014
- 0 Comments
This is one simple design but I've been longing to get this one done WITHOUT messing up. I can't tell you how many attempts I've had with this manicure because I can't quite remember myself but it's finally done!
The base is OPI's Ski teal we drop which is my favourite teal; still feel the same about it everytime it's worn. This one just never gets old with me. After applying some striping tape, I carefully painted half the nails with China Glaze's Icicle which is just a shimmery foil.

Definitely pleased with the overall look of this one. It still looked a little fresh even between 1-3 days of wear especially after a nail file down. Looked similar to how it was after it was first done.

Most times I like to picture the base colour on its own before I go ahead with any design just in case things don't turn out right. Experience learned from all the other times that it didn't. This is OPI's STWD without a top coat.

This one had smooth application and normal consistency. Like most polishes the first coat is sheer and but to a minimum, just a few patches here and there. There's no complaints after two coats because everything was covered.

So what do you like to pair your silver polishes with? What's your favourite teal? :)
- Friday, October 18, 2013
- 1 Comments
It's almost 3am here in London so I'm going keep things short and sweet here. Work has been crazy since the amount of overtime I've done is making me feel like a full time worker. On top of that I've been preparing for an upcoming interview this Monday. Ahh stress! All my energy is shared out between work and my sister's pet bunny that I have very little for blogging but I'm going to do what I can. I'd hate to give up on this blog!
Anyway, this was a manicure done a year or so ago. Whilst flipping through my old pictures, I thought it would've been nice to recreate again.
The base is OPI's Lucky lucky lavender, just a very pinky lavender shade which is definitely underused in my collection. It required at least three coats for me due to the first two being sheer but everything looked okay on the third. The formula itself was thin and runny and apparently clean up didn't feel smooth either (or so that's what my manicure notes in scruffy handwriting says LOL.) This is LLL on it's own without a top coat.
Using the Konad stamping polish in white I stamped the image from the Bundle monster plate 224. If you look properly you'll see I also added pink rhinestones on each nail apart from the pinkie, as to why I left that one out? I don't even know myself.
One more thing before I end this post. I'd just like to announce that:

Anyway, this was a manicure done a year or so ago. Whilst flipping through my old pictures, I thought it would've been nice to recreate again.
 |
| Light box photo. |
The base is OPI's Lucky lucky lavender, just a very pinky lavender shade which is definitely underused in my collection. It required at least three coats for me due to the first two being sheer but everything looked okay on the third. The formula itself was thin and runny and apparently clean up didn't feel smooth either (or so that's what my manicure notes in scruffy handwriting says LOL.) This is LLL on it's own without a top coat.
 |
| Light box photo. |
Using the Konad stamping polish in white I stamped the image from the Bundle monster plate 224. If you look properly you'll see I also added pink rhinestones on each nail apart from the pinkie, as to why I left that one out? I don't even know myself.
 |
| Indoor window photo. |
 |
| My manicure in a different hand position to let you see how it looks. Light box photo. |
One more thing before I end this post. I'd just like to announce that:
I'M ON INSTAGRAM!
There's not much on it at the moment but I'll be posting about other things other than nails like my sister's bunny and yummy yummy food ^^ Click to follow!
- Saturday, September 28, 2013
- 2 Comments
I have a quick OPI to show you today but it's nothing new. It's a beautiful shade that is definitely underused in my collection. I just never find myself reaching for it too often. It's OPI's Russian navy which is a deep navy purple with pink and blue shimmers.

OPI's RN has a lovely formula. Each layer goes on nice and thin but I'd say two coats is ideal. The first coat is almost close to opaque. Close but not quite there yet unless you do more of a thicker coat. OPI is known for their wide brushes and the brush on this one is no joke. For my average sized nails they worked alright without being too troublesome.


Other than the lightbox photo I also included one taken indoors with the sun shining on it just to bring out the sparkly side for you to see and two outdoors on the balcony. Lovely isn't it? Shame the shimmers go into hiding as soon as they're out of the light.

Even though RN is full of pink shimmers they just weren't enough for me so I added Barry M's Amethyst glitter on top which matches great against the base. I applied one coat to every nail except the one on the ring finger which has two. The next day I realised a minor chip on my index finger though, I'm guessing maybe some of the glitters I left hanging off the edge clung onto somewhere. That's okay, it just gives me an excuse to redo my nails :)
What do you think of OPI's RN? Do you prefer it with or without the Barry M glitter?
- Wednesday, June 19, 2013
- 1 Comments
Very simple manicure today :)


Products I used:
China Glaze's Below deck is actually more of a purple-brown but it looks just like a normal brown in all the photos I took.
I used OPI's Russian navy thinking it'd show up against the base but it turned out looking black. It was almost the same case with the Konad polish.
I was planning to stamp just one flower onto the middle of my accent nail but as you can see I totally missed the spot. Ended up adding more flowers on the side plus a rhinestone to make up for the mistake.
The striping tape didn't last long either. Taped it onto my nail in the morning and it started peeling by the night.
What do you think of my manicure?


Products I used:
- Two coats of China Glaze's Below deck as the base
- Black striping tape to line the tips
- OPI's Russian navy to line the tips on the accent nail
- Flower image on plate BM03 stamped with Konad polish in royal purple
- Light blue rhinestone placed in the middle of the flower
 |
| All photos taken indoors. |
China Glaze's Below deck is actually more of a purple-brown but it looks just like a normal brown in all the photos I took.
I used OPI's Russian navy thinking it'd show up against the base but it turned out looking black. It was almost the same case with the Konad polish.
I was planning to stamp just one flower onto the middle of my accent nail but as you can see I totally missed the spot. Ended up adding more flowers on the side plus a rhinestone to make up for the mistake.
The striping tape didn't last long either. Taped it onto my nail in the morning and it started peeling by the night.
What do you think of my manicure?
- Thursday, March 21, 2013
- 7 Comments
It’s officially Spring tomorrow
and already I'm bringing out all my pastels and brights.


This manicure consists of two main
shades both from Essie and two glitters from China Glaze. On my index and
middle finger are three coats of Absolutely shore which Essie describes as 'a soft sea
foam green', a pretty fair description if you ask me.
On the
rest I applied three coats of Essie's Van D'go. Van D'go is said to
be a 'peachy keen shade' and is lovely but it always makes my hand look a bit
dark and tanned whenever I’m wearing it.
 |
| Photo taken indoors with artificial light |

Products I used:
- Index: Essie's Absolutely shore as base
Using striping tape to line the tips and paint over with Essie's Van D'go
- Middle: Absolutely shore as base
Sponged with China Glaze's Lorelei's tiara on tips
- Ring: Van D'go as base
Using striping tape again to line the nail and paint over with Absolutely shore
Stamped the lollipop image from plate BM02 with OPI's Conquistadorable color
Went over the image with China Glaze's Ring in the red since OPI’s CC didn’t seem to show properly
- Pinkie: Van D'go as base
Sponged with ring in the red on tips

 |
| All other photos taken indoors, natural light |
This is how the manicure looked before I added the stamping. I could’ve left everything like so
but for some reason the striping tape left behind some black marks. It's most
obvious on the accent nail which kept annoying me so I covered it with a
lollipop image. Much prefer the 'before' look.
What's your favourite pastel shades?
- Tuesday, March 19, 2013
- 4 Comments
It's a little late but hope everyone had an amazing Christmas and a very happy new year.
I fell into the lazy trap for a month or so that's why I haven't been keeping up with my blog posts, that doesn't mean I've slacked on the photography part though. I've managed to capture most of the manicures I've done, just the post writing part puts me into a deep sleep. I'll try and include a brief description of what I can remember from each.
I kind of hate to bring my old manicures into the new year but since I never managed to post them when I was supposed to I decided on a nail spam post. It feels incomplete to not show these anywhere. If you haven't realised from my posts, I like to upload quite a few shots of the same manicure with little difference between some or all of them so don't be surprised to see the same thing happening here.
Most of these are mainly fall polishes, I didn't get a chance to purchase any winter ones. This is by far the longest polish no buy I've been on. It's been months already which makes me think I'm doing quite well.


Exotic encounters is from China Glaze’s On safari collection, it looks like a teal crème that leans more green but I eventually ended up calling it green. The
consistency of this one is a little thick but you could still work with
it. If I remembered right I think I used two coats with this one, it
couldn’t pass off as a one coater in my opinion.
I received a compliment at work; it didn’t convince me to keep it on for much longer though. My feelings towards exotic encounters didn’t beat the excitement I had for doing another water marble design so I ended up removing it after two days.


This water marble didn’t come out as good as the others. I messed up on every finger even with the nail on my ring finger just that the mistakes aren't as obvious. I managed to tear away a small part of polish whilst removing the tape around my cuticles and that's not the first time I’ve done so. I didn’t cover every part of the other nails when I dipped in my finger so I double dipped my middle finger and pinkie, not a good idea.


Looking at these photos makes me slightly sad because it was the manicure I done the night before my last day at work. It's remembered as my leaving work manicure but on the brighter side it’s the first time trying an orange polish. It is quite a bright orange but it didn’t scare me off which I’m quite happy about. Now I can include more oranges on my to buy list.


Feels ever so long since I had such a dark colour on my nails and I’m quite surprised with this one in fact. Prey tell is a very deep blood red that's close to black. Application didn’t go as smooth this time though, not because of the formula but the amount of time I was working with. I hardly ever let myself polish my nails in a hurry but I felt it was impossible to attend the social gathering I had with bare nails. I happened to smudge the same finger 3 times and it had to be that middle finger. It only needs two coats though. One if you're willing to apply it a little thick and evenly.


Here's China Glaze's Man hunt, a slightly dark, rich blue with a sort of thick formula but you could still paint two coats with little problem. This shade was nothing too special for me so I pulled out my stamps and plates on it. Using Essie's Blanc I stamped a design on the Bundle monster plate BM10 on my index, middle and pinkie. With a flower design from the same plate I decorated my accent nail and finished off with some dots using Orly's Flare.
This design reminded me a little of Christmas. Maybe because the colours brought my memories back to Primary school days where we used to participate in the Christmas plays. The words Frankincense and Myrrh comes to mind with this manicure though I Googled some images and they don't seem to relate.
I would say the photos with the design is a little more accurate. It isn't as light as you see it in the first two.

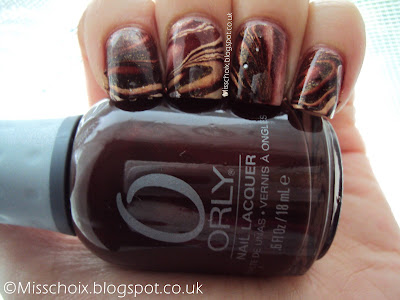


Another water marble design. I love them just not so great at them. I still haven't managed to solve the air bubble mystery as you can see on the nail on my ring finger. Accidentally ripped a part from my pinkie too otherwise this manicure would have been acceptable.
The dark shade is Orly's Rapture which I paired with Orly's Flare on two coats of Essie's Blanc as the base. I was aiming to do the light and dark contrast design but the outcome was a little surprising. Turned out looking more like an animal print to me.


This one is China Glaze's Elephant walk, a grey with small silver shimmers that I quite liked though the shimmers were pretty subtle to me. Formula is a little thicker than normal but I didn't come across any problems with it. Two coats is what I'm wearing in the photos.


Only after looking closely at these photos on a computer screen did I think 'What a bad paint job in some places' but let me introduce you to China Glaze's I herd that. It's a mixture of yellow-y gold and orange glitter in a clear base and it really isn't that orange like the last three photos. The first two I would say is a little more accurate.
The polish is pretty dense but I applied around two to three coats just so my nails were jam packed with glitter. It does dry to a matte finish though so bring out the topcoat if you prefer the glossy look.


This one I quite like and it's Orly's Ignite which is a deep red jelly. I thought it'd be some sort of blood red but it dried a little brighter than that. It's also a little sheer so if you look closely you could see some VNL and that's just with two coats. I preferred to keep it at that rather than adding to it since I'm not so bothered about the sheer look. Application was great as with the others I've tried. Really liking this brand and the fact that it provides 18ml of product I'd happily go and purchase more.
This one I don't have much to say about except I wasn't too fond of it. Didn't turn out too bad in the end because for a moment I thought it looked al right. China Glaze's Kalahari Kiss is like a rusty creamy camel yellow. It is a little thick though but yet again it does fine with just two coats. The formula does take a bit to get used to.


Here's Orly's Rapture which is a deep chocolate brown. Start flashing it under some light and you'll see the brown side of it much clearer. I went ahead with just two coats with this one and the formula was as smooth as butter.
I decided to do some nail stamping just so they didn't look so plain. I pulled out my Bundle monster plate BM14 and used the snowflake design on every nail apart from the one on my ring finger which I layered with OPI's Divine swine. Using a dotting tool I added some glitter to the middle of each snowflake. It looked better in person in my opinion. This ended up being my only Christmas manicure I did.


I fell into the lazy trap for a month or so that's why I haven't been keeping up with my blog posts, that doesn't mean I've slacked on the photography part though. I've managed to capture most of the manicures I've done, just the post writing part puts me into a deep sleep. I'll try and include a brief description of what I can remember from each.
I kind of hate to bring my old manicures into the new year but since I never managed to post them when I was supposed to I decided on a nail spam post. It feels incomplete to not show these anywhere. If you haven't realised from my posts, I like to upload quite a few shots of the same manicure with little difference between some or all of them so don't be surprised to see the same thing happening here.
Most of these are mainly fall polishes, I didn't get a chance to purchase any winter ones. This is by far the longest polish no buy I've been on. It's been months already which makes me think I'm doing quite well.


 |
| China Glaze's Exotic encounter Taken in indoors, natural light with a bit of sun :) |
I received a compliment at work; it didn’t convince me to keep it on for much longer though. My feelings towards exotic encounters didn’t beat the excitement I had for doing another water marble design so I ended up removing it after two days.
This manicure was done around the time I started using a new top and base coat which I’ll review some time later most probably when I’ve come close to finishing both bottles.


 |
| Water marble with China Glaze's First mate, Stella and Swing baby All photos taken outdoors in natural light |
I used:
Poshe fast drying base coat
Two coats of Essie’s Blanc
China Glaze’s First mate, Stella and Swing baby
INM’s out the door fast drying top coat
Poshe fast drying base coat
Two coats of Essie’s Blanc
China Glaze’s First mate, Stella and Swing baby
INM’s out the door fast drying top coat
All colours were from China Glaze since it’s the dominating brand in my collection, it even has a drawer of its own. The blue crème is First mate from their Anchors away collection; this was one of the colours I made my first blog post about which you can review Here. The purple shimmer is Stella but you can’t really tell the finish from the photos, sometimes it even looks like it has a hint of pink to it too. Swing baby is the last shade I used which is a gold shimmer with a foil finish. I never knew it could look that pretty in a water marble design. I remember when I first wore Swing baby on its own and I wasn’t impressed.


 |
| Orly's Flicker First two photos taken indoors and the last taken outdoors all in natural light with a wee bit of rain |
Orly’s Flicker is a rust duo chrome Shimmer. This one seems to shift from orange to red and I see some sort of gold-ish yellow flash to it in the bottle. The duo chrome effect isn’t so obvious once it’s applied to the nails though so I see more orange than anything else. Ever since I’ve tried my first Orly I’ve never been disappointed in their formula and application and there’s no exception with this one. Everything went smooth with two thin coats of flicker.


 |
| China Glaze's Prey tell First two photos taken outdoors and last two taken indoors. Natural light. |


 |
| China Glaze's Man hunt All photos taken outdoors in natural light. Man hunt looking more colour accurate in the last two |
This design reminded me a little of Christmas. Maybe because the colours brought my memories back to Primary school days where we used to participate in the Christmas plays. The words Frankincense and Myrrh comes to mind with this manicure though I Googled some images and they don't seem to relate.
I would say the photos with the design is a little more accurate. It isn't as light as you see it in the first two.


 |
| Water marble design with Orly's Rapture and Flare All photos taken outdoors in natural light. |
The dark shade is Orly's Rapture which I paired with Orly's Flare on two coats of Essie's Blanc as the base. I was aiming to do the light and dark contrast design but the outcome was a little surprising. Turned out looking more like an animal print to me.


 |
| China Glaze's Elephant walk All photos taken indoors with natural light. |


 |
| China Glaze's I herd that All photos taken indoors. |
The polish is pretty dense but I applied around two to three coats just so my nails were jam packed with glitter. It does dry to a matte finish though so bring out the topcoat if you prefer the glossy look.


 | ||
| Orly's Ignite First photo taken indoors with a bit of sun. Second and third taken outdoors, natural light. |
 |
| China Glaze's Kalahari kiss Photo taken indoors, natural light. |


Here's Orly's Rapture which is a deep chocolate brown. Start flashing it under some light and you'll see the brown side of it much clearer. I went ahead with just two coats with this one and the formula was as smooth as butter.
I decided to do some nail stamping just so they didn't look so plain. I pulled out my Bundle monster plate BM14 and used the snowflake design on every nail apart from the one on my ring finger which I layered with OPI's Divine swine. Using a dotting tool I added some glitter to the middle of each snowflake. It looked better in person in my opinion. This ended up being my only Christmas manicure I did.


 | |
| Orly's Rapture with Divine Swine and design from plate BM14 All photos taken indoors apart from this one. |
 |
| Left hand design :D |
The last picture shows my left hand and being a righty I found it pretty tricky positioning and take photos of my hand at the same time. I wanted to show you the design I had on my left since I added some dots.
Ahh this took me long enough to write up.The photos seemed to look much better on the camera screen than here but hope you still enjoy this post.
Out of the bunch which NOTD was your favourite?
Thanks for reading!
- Monday, January 07, 2013
- 0 Comments


